User
Setup Settings User
Create and assign Users and Groups based on various levels of permissions for more efficient management of access to the ConnexCS Control Panel. Permissions are managed by Groups, and at a Granular level for every endpoint in the system.
Users
To add a new ConnexCS User, click the button in the Users section on the left.
Field descriptions
- Name - The user's name.
- Groups (optional) - Select one or more Group(s) to be assigned to the new user. This will define their permission levels. It is additive, meaning that if a User is in a Read-Only Group as well as a Group that has Edit permissions for a specific area, they will be able to make edits in that area. While it is possible for a user to belong to multiple-groups, it is easier to manage a user with only 1 group. (See details below on creating Groups.)
- Reseller Account (optional) - Used to restrict Resellers with multiple logins to an account. (See below for details on creating Default Resellers.)
- Password - Enter the password they will use to access the Control Panel. We recommend agents set a default password then advise the user to reset the password immediately after logging in for the first time. This best practice increases user account security by ensuring only the user knows the password.
- Role - Select "User" or "Administrator". This is mostly just for informational purposes, as permissions and access will still be handled based on the assigned Group. If no role is assigned, the ConnexCS assigns the role of Administrator.
- Email - The user's email address. It is recommended this is an email address that is used often. Note: As a security measured, if the email address is changed the original password will not be saved.
- Time Zone - Select the User's time zone.
- IP Whitelist - Specify the IP or range of IPs this user can use to connect to the ConnexCS Control Panel. They will not be able to login from any other IP, so be careful with this setup. Specify IPs as follows:
- Single IP address - Ex: 1.1.1.1
- Wildcard for IP addresses - Ex: 1.1.1.
- Range of IP address in CIDR (Classless Inter-Domain Routing) format - Ex: 1.1.1.0/31
- Shared Ticket - If enabled, all Users in the account can view tickets created by this user, based on the email address of this User.
Once the details are entered, click the Save button.

Why should you specify an email address that you use often?
- The email address is the username to log into the user account.
- ConnexCS sends an email to the email address, to verify that you own the email address.
- ConnexCS sends notifications such as credit alerts and low balance alerts to that email address.
What if I forget my password?
You can reset your password on the ConnexCS Control Panel Login page. If you are unable to do so, contact the administrator who created your user account.
Change User Password
You can change a user's password (used to log into the ConnexCS Control Panel) if the user has forgotten the password. To change the password, you do not need to know the user's current password.
To change a user's password:
- Click the
Change Passwordlink to the right of the User. -
In the New Password text box, enter the new password. Tip: Hover over the New Password text box to see the passwords requirements.

-
Confirm the password by entering the same password.
- Click
Save.
How should I inform the user about the password change?
When you change a user's password, ConnexCS does not send the new password to the user. You must email or text the new password to the user.
Groups
Use a Group to assign a specific set of Control Panel access permissions to multiple users. Typically, you create user groups to assign permissions depending on the roles that the users play in your Carrier Service business model.
Example Group Roles
Network Services Engineering needs permissions to set up routing but should not have access to customer billing details. Alternately, the Billing team needs permissions to access and modify customer billing details but not to set up routing for customer calls.
Step 1: Create Group
- Click the button in the Groups section.
- Enter a Group Name (ex: Engineering, Sales, etc).
- Set Default Permissions for the group's global permissions:
Create,Update,Read, andDelete. All 4 will be selected by default. Click the X to remove a permission. Click the down arrow on the right to add a permission. - Click
Save. The new Group will be listed.
Step 2: Specify Group Permissions
-
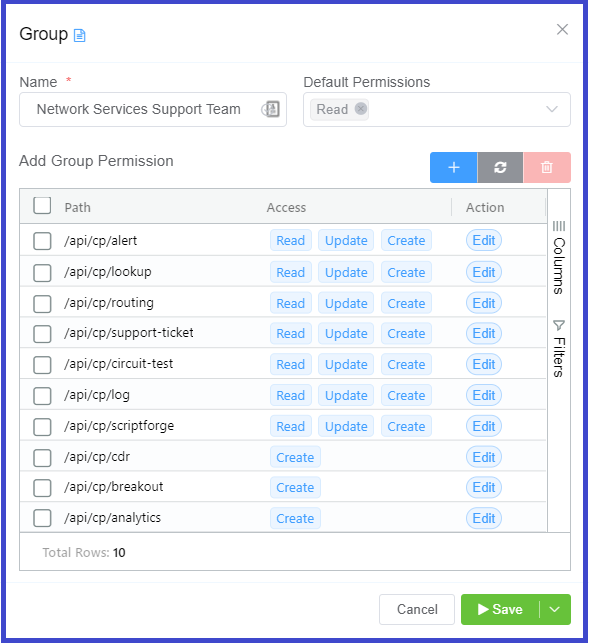
Click on the Group to view the "Add Group Permission" table. Click the next to the table.
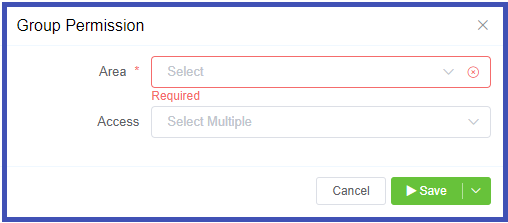
- Area: Select the functional area of the Control Panel for the specific permission (ex: Customer, Carrier, Logging, ScriptForge, etc).
- Access: Define the granular permissions for this area. All 4 access options can be selected. If none are selected, then users in this Group will get "Access Denied" when they try to go to the area.
- Set as many Area/Access permissions as needed.
- Once finished, select
Save.

-
The new permissions will be visible in the Add Group Permission table, with the following fields:
Path- the path to the functional Area's APIAccess- the level of permissionsAction- allows you to Edit the Area and Access permissions
-
Make sure you
Savethe Group with the new permissions.
Group Permission Access exceptions
The permissions for the Analytics and CDR Areas are always Access Denied (no other permissions are allowed). If Breakout is selected, an "Allow Access" box appears. Unchecked will set permissions to Access Denied; Checked will set permissions to Read Create.
Permissions Model
The ConnexCS permissions model consists of two levels:
- Global (Default Permissions) are set for the Group.
- Granular (Add Group Permission) are set for a specific Area of the ConnexCS Control Panel.
Permissions are determined by level and access:
- The Global and Granular access are categorized as Create, Read, Update, and Delete (CRUD).
- Granular permissions override and nullify all Global permissions. Ex: If you assign CRUD permissions Globally, and assign Granular Read permissions to 3 features, the group will have Read-Only permissions for those 3 features.
- If you do not assign Granular permissions to a group, the group has access to use all features in the ConnexCS Control Panel based on the level of Global permissions (CRUD). Ex: If you assign only Create and Read permissions globally, the group has permissions to create and read data for all features.
Default Reseller
This feature allows you to create a quick default set of permissions suitable for resellers. Simply click on the Create Default Reseller to create a new Reseller Group. Multiple Reseller Groups can be created, and each can be edited to match your business needs.
Alpha Feature
The Default Reseller feature is still an Alpha Feature in testing, please use with caution.