Auth
Under the Auth tab, configure IP or SIP (Username/Password) Authentication.
IP Authentication
When you enable IP Authentication, you associate the IP of a customer switch to their account. This add a layer of security by ensuring the calls are coming from a trusted source.
Newly added IP immediately marked as Blocked under IP Authentication
This occurs because call requests were sent from the new IP before it is authorized. As a result, ConnexCS fraud detection blocked the unauthorized IP in the firewall. Attempted calls from this IP will not be completed. To resolve the blocked IP, go to Setup Advanced Firewall. Select the blocked IP, then delete it from the firewall. This unblocks the IP, but it will take up to 15 minutes for the change to become active in the switch. See Threat Detection for more details.
Enable IP Authentication
To enable, click the next to IP Authentication:
Click each tab to view configuration details
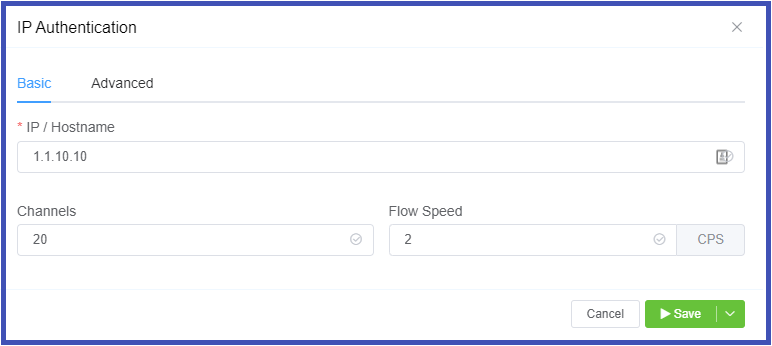
- IP: Enter the IP(s) or Hostname of the switch.
- Channels: Set the maximum number of concurrent calls for this switch.
- Flow Speed: Set the Calls Per Second (CPS) (0 = unlimited calls).

- Codecs: All Codecs are supported unless specifically set as "Restricted" here.
- Manufacturer and Version: These references fields allow you to enter the switch Manufacturer and Version if desired (these fields are not functional; they are informational only).
- Protocol: Select SIP (UDP) for the protocol (
SMPP: SMPP, for SMS, is not currently supported). - Port: Default = 5060. If using TLS protocol, this should be set to 5061.
- Dial Pattern: Default = E164. The default selection is the industry standard.
- CLI Prefix, Tech Prefix, Strip Digits: Do NOT Use these fields. Please contact us for assistance if needed.
- Bandwidth, Force From: Do NOT Use these fields.
- Username, and Password: Set when sending calls out (egress switch direction) to a remote system, setting this will allow the ConnexCS switch to operate as a client, or UAC. Not typically recommended unless you have a very specialized system.
-
Switch Direction: The available options are from the perspective of the customer switch (PBX, dialer, etc), and describe how that switch interacts with the ConnexCS switch. For switches that send and receive calls from ConnexCS, there will need to be separate entries for each direction.
Ingress: This switch receives calls from ConnexCS.Egress: This switch sends calls to ConnexCS.
IP Authentication Audit Log
After IP Authentication has been setup, click on the IP to view configuration. At the top of the Authentication pag, select "View Audit Log" to view changes specific to these settings.
SIP User Authentication
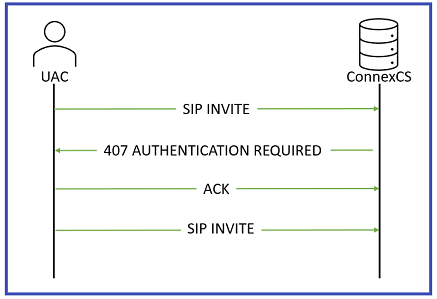
When SIP Authentication is enabled, ConnexCS will reject the initial SIP INVITE with a "407 Authentication Required". This message includes a 'nonce' (a uniquely randomly generated number, which has been hashed). Your switch will send appropriate authentication information to ConnexCS, which will connect the call.
Generic SIP Trace showing the Challenge Response:

Enable SIP User Authentication
To enable, click the next to SIP User Authentication:
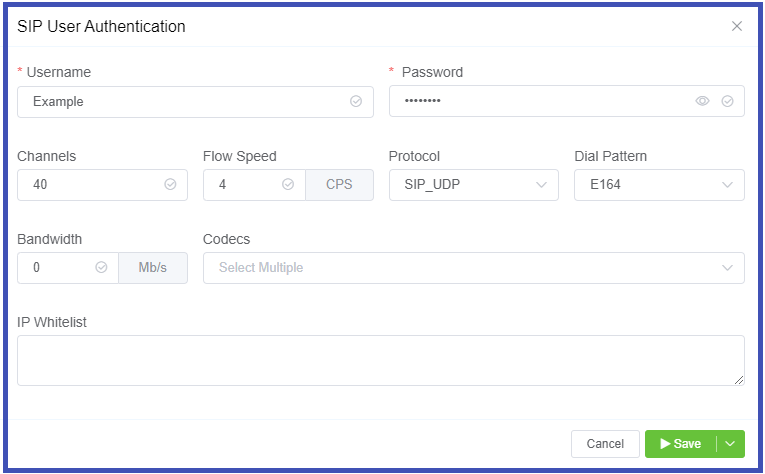
- Username: This will be the Username used for SIP authentication (must match configuration on your UAC).
- Password: Must match configuration on your UAC.
- Channels, Flow Speed, Bandwidth; Do NOT set use these fields. Please contact us for assistance.
-
Protocol: Select the protocol for SIP (call signaling) RTP (transport/audio).
UDP: SIP and RTP are unencrypted and transported over UDP.TCP: SIP is sent over TCP, RTP over UDP.TLS: SIP is sent over TLS (TCP), RTP over UDP.TLS & SRTP: SIP is sent over TLS (over TCP), RTP is encrypted with SRTP.SMPP: SMPP, for SMS, is not currently supported. -
Dial Pattern: Default = E164. The default selection is the industry standard.
- Codecs: All Codecs are supported for the SIP user unless specifically set as "Restricted" here.
- IP Whitelist: Enter specific IPs, or use CIDR notation to specify an entire subnet.

Reset SIP Password
Click the SIP Username, then replace the password and click Save.
Delete IP or SIP User
To delete an IP or SIP User Authentication, check the box next to the IP Address or Username, then click the Trash Can icon for that section.